Hello Stampers!!
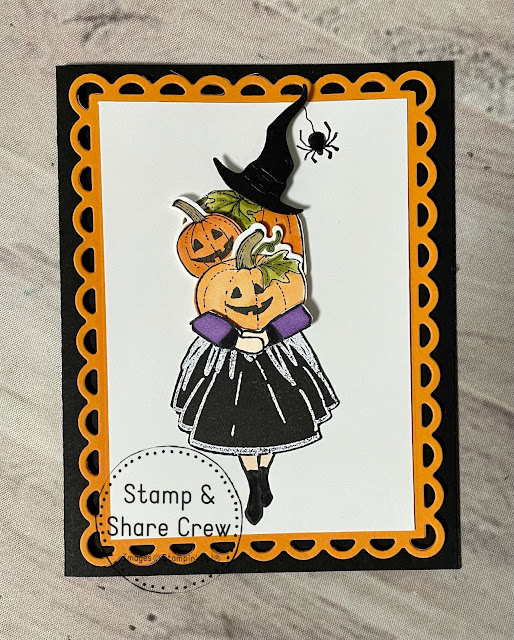
How about some more cheer today??? More Delivering Cheer that is!!! Here is another sweet alternative project using that sweet gal...just in time for a darling Halloween card!! Supplies and Measurements below!
- · Stamp Sets: Delivering Cheer (156268), Pretty Pumpkins (156478), Banner Year (158239), Frightfully Cute Bundle (156493)
- · Card Stock and Paper: Basic Black (121045), Pumpkin Pie (105117), Basic White (159276)
- · Stamp Pads: Versa Mark (102283), Memento Black (132708), Blends: Highland Heather (154887), Pumpkin Pie (154897), Petal Pink (154893), Old Olive (154892), Cajun Craze (154879), Soft Suede (154906), Basic Black Stampin’ Write Marker (100082)
- · Tools: Scalloped Contours Dies (155560), Heat Tool (129053
- · Miscellaneous: Basics Embossing Powders (155554), Stampin’ Dimensionals (104430); Stampin’ Seal Adhesive (152813)
Measurements:
- · Basic Black: 8 ½” x 5 ½”, 2 ¼” x 1 ¾”, plus scrap
- · Pumpkin Pie: 5 ½” x 4 ¼”
- · Basic White: 4 5/8” x 3 ¼”, 3” x 2 ½”
Instructions:
1. 1.Score and fold card base at 4 ¼” on long side.
2. 2. Die cut Pumpkin Pie cardstock using Scalloped Contours Die (largest one), then adhere to card front using Stampin’ Dimensionals.
3. 3. Stamp leg image using Delivering Cheer stamp set on to largest Basic White cardstock piece.
4. 4. Color legs using Light Petal Pink Blends and create witch boots using Stampin’ Write Black Marker.
5. 5. Stamp dress image on Basic Black cardstock using Versamark Pad.
6. 6. Sprinkle white Embossing Powder on image and use Heat Tool to emboss.
7. 7. Fussy cut skirt and adhere to card front.
8. 8. Stamp arms and pumpkin image on scrap white cardstock.
9. 9. Color pumpkins using Pumpkin Pie, Cajun Craze, Old Olive, and Soft Suede Blends.
10. 10.Stamp jack o’ lantern face on pumpkins using Memento Black ink
11. 11. Fussy cut pumpkins apart and adhere above dress, arranging them so you don’t see where parts are cut away from the pumpkin) using Stampin’ Dimensionals.
12. 12.Color arms using Highland Heather and Petal Pink Blends, and also Basic Black Stampin’ Write Marker.
13. 13.Fussy cut arms and adhere to card front as shown in photo using Stampin’ Dimensionals.
14.14. Die cut Basic Black witch hat from Frightful Tag Dies and place on top of pumpkins using Stampin’ Dimensionals.
15. 15.Color JUST THE SPIDER on stamp using Basic Black Stampin’ Write Marker and stamp beside witch’s hat.
16. 16.Draw a squiggly line using Basic Black Stampin’ Write Marker from top of hat to spider.
And as always if you have any questions..please fell free to contact me...I am always happy to help!!
Love, Renee 💖
Click Here to Join our Team today!
Check out my Facebook Fridays for a weekly Stamp Therapy!! Every Friday Morning at 11am CST at my page Water City Stamping Facebook Page
Thank you so much for your online orders! I truly appreciate it!
And don't forget to join my Water City Stamping V.I.S. (Very Important Stamper!) Facebook Group for more creative ideas, specials and current updates!! CLICK HERE TO JOIN!


No comments:
Post a Comment