Thursday, December 30, 2021

A Paper Pumpkin Thing Blog Hop - Lots of Pun!

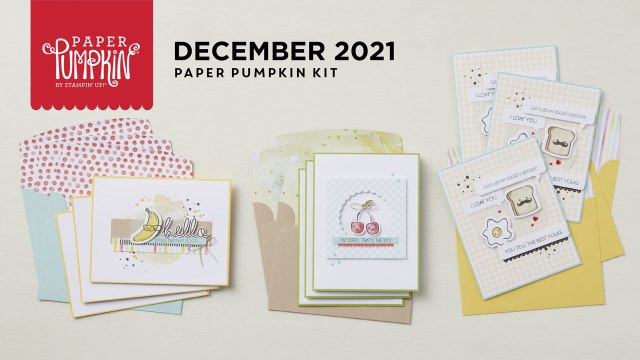
Thank you for stopping by at A Paper Pumpkin Blog Hop!  This months kit ...Lots of Pun was a lot of fun to work with. Cute images of cherry, bananas, eggs and toast ...along with quippy sayings made this pumpkin sweet!


But when I saw the egg image...right way I thought of flowers!


So I added Granny Apple Green stems....with leaves punched from the Flowers and Leaves Punch.  


I added them all to the Daffodil Delight Gingham card...added a greeting and a few Pool Party gems included in the kit,   Quick and cute!


For my next project ...I decorated a 3 x 3 Acetate Box found in the main Stampin' Up! Catalog.
I then dismantled a included envelope and used it for Designer Series Paper!
Cutting the envelope paper to 2 7/8 x 2 7/8 ...add some cherries with faces...a word bubble and a simple hello decorates the front of the box.


You can use it for a variety of things...fill with candy...add a small gift...but I used it for a set of funny punny 3 x 3 cards!


First card...using 6 x 3 Granny Apple Green CS and some more of that envelope DSP.   This time I stamped the cherries...colored them with Real Red and Granny Apple Green Stampin Blends.
Don't forget to decorate the envelope...still using the envelope DSP!


Next how about another "egg" flower!!
Adding a 6 x 3 piece of Pool Party CS scored at 3".  Add the included Blue Gingham background...a stem and a leaf.  Colored again with Pool Party and Daffodil Delights Stampin Blends.


Next using a different envelope cut it down to 2 3/4 x 2 3/4 and add it to a 3 x 3 Crumb Cake card
Add a greeting and 2 of the toast images included in the kit.  


And finally...for this card...I cut one of the gingham cards included...added Daffodil delight CS and stamped the banana...I though he looked super fun with the "stache"!


What a funny punny gift!!  And...if you would like video direction for any of these cards...check out my Facebook Live HERE!


And now it is time to see what the other fabulous demonstrators have created!!

Happy Hopping!!💓


And now...here is what is coming up!!

How about a sneak peak for the February Paper Pumpkin ......I can't wait for this one!!!   How about you...just subscribe or order by January 10th!!  

We all know that roses are red and violets are blue—it’s time that love-themed cards got an upgrade! The Kisses & Hugs Paper Pumpkin Kit will help you express that forever kind of love with heart-shaped cards that would make Cupid jealous. 

The Kisses & Hugs kit is not bound to just Valentine’s Day, it works for all love occasions year-round like anniversaries, weddings, birthdays, or those “just because” days. 


Or if you would like a prepaid subscription AND to earn FREE Salebration Items...order a 3, 6 or 12 month subscription starting January 4th and get FREE Stamps or Paper!!  WOOHOO!!  Win! Win!!

CLICK HERE TO SHOP PAPER PUMPKIN!!

And as always thank you for choosing me as your demonstrator!!!  Please use the Hostess Code RJ39EZBT


 when ordering under $150 ...If you order over $150...take the Hostess Rewards for yourself!!

Take care and Happy Stamping!
Renee Kohnke
Independent Stampin' Up! Demonstrator
SHOP: www.reneekohnke.stampinup.net
BLOG: www.watercitystamping.blogspot.com
FACEBOOK: https://www.facebook.com/Water-City-Stamping 
Join Me every Friday at 11am CST for Friday Facebook Live...A Little Stamp Therapy!


Thursday, November 18, 2021

The "Stars Are Shining!"

 Our local Holiday Parade is tonight...and this card reminds me of the stars decorating all the street lights on Main Street!   So pretty!  And the season starts today!!


Stars Are Shining


Here are the details...

Supplies:

  •        Stamp Sets: Stars Are Shining (156345) or as a discounted bundle with the Starlit Punch (156780)

·        


  ·       Card Stock and Paper: Misty  Moonlight (153081), Silver Foil 12” x 12” Specialty Pack (156457), Basic White (159276)

·         Stamp Pads: Misty Moonlight (153118)

·         Tools: Starlit Punch (156380) or as a discounted bundle with the Stars Are Shining stamp set (156780), Stitched Stars Dies (150653)

·         Miscellaneous: Mini Stampin’ Cut & Emboss Machine (150673), Subtle Shimmer Sequins (156407), Simply Elegant Trim (155766), Take Your Pick Tool (144107), Mini Stampin’ Dimensionals (144108), Stampin’ Dimensionals (104430); Mini Glue Dots (103683), Multipurpose Liquid Glue (110755), Bone Folder (102300), household tape


Measurements:

  • ·         Misty Moonlight: 5-1/2” x 8-1/2”, scored at 4-1/4” and burnished with the Bone Folder; 7/8” x 2-1/4”, scraps for three stars
  • ·         Silver Foil: 3-3/4” x 5”, 2” x 4-1/2”
  • ·         Basic White: 3-1/2” x 4-3/4”
  • ·         Ribbon: 13”


Instructions:

1.    On Basic White panel and with Misty Moonlight ink stamp the multi-star image three times on a diagonal starting from lower left corner and ending on upper right corner. With Multipurpose Liquid Glue adhere panel to Silver Foil layer.

2.    Stamps stars again onto Misty Moonlight cardstock scraps and punch with Starlit Punch. Set aside.

3.    Stamp sentiment on small Misty Moonlight rectangle and set aside.

4.    Die cut star swirl from Stitched Stars Dies out of Silver Foil. With Multipurpose Liquid Glue adhere on top of Basic White star stamped piece.

5.    Place one Mini Glue Dot on the back of each Misty Moonlight star. Adhere Silver Simply Elegant Trim to back and gently press in. Add either a regular Stampin’ Dimensional or a mini size, depending on star size, and adhere to front of card. Wrap trim around back of card front so its about 1” onto the back. Snip it off, place a Mini Glue Dot where end will land, press in then secure further with a small piece of household tape. Repeat for the other two stars.

6.    Adhere card front to card base with Stampin’ Dimensionals and do the same to add the sentiment.

7.    With your Take Your Pick tool and Multipurpose Liquid Glue, adhere tiny dots of glue and place a silver sequin where desired. Let dry.


And as always if you have any questions..please fell free to contact me...I am always happy to help!!


until next time...take care and happy stamping!!

Love, Renee 💖 


Click Here to Join our Team today! 


Check out my Facebook Fridays for a weekly Stamp Therapy!!  Every Friday Morning at 11am CST at my page Water City Stamping Facebook Page

Thank you so much for your online orders!  I truly appreciate it! 

Click here to shop now!!  

And don't forget to join my Water City Stamping V.I.S. (Very Important Stamper!) Facebook Group for more creative ideas, specials and current updates!!  CLICK HERE TO JOIN!


Wednesday, November 10, 2021

Another Classic Cloche - So Pretty!

 Here is another "pretty" using the Classic Cloche...but with no cloche!!   I love all the elements on their own...the birds and the trees are lovely just on their own.   Read below to for all the details to make this card! 


Supplies:

·         Stamp Sets: Classic Cloche (156355) or

·         discounted as a bundle with the Cloche Dies (156786)

·         Card Stock and Paper: Soft Suede (115318), Basic White (159276), Red Velvet (153490), Garden Green (102584)

·         Stamp Pads:  Tuxedo Black Memento Ink Pad (132708); Early Espresso (147114)

·         Tools: Cloche Dies (156386) or discounted with a bundle with the Classic Cloche stamp set (156786); Scalloped Contours Dies (155560); Messages Die (154422); Timeworn Type Embossing Folder (156505)

·         Miscellaneous: Real Red Mini Ruffled Ribbon (156323); Real Red Stampin’ Blends (154899); Daffodil Delight Stampin’ Blends (154883); Elegant Faceted Gems (152464); Stampin’ Dimensionals (104430); Mini Stampin’ Dimensionals (144108); Stampin’ Seal Adhesive (152813); Mini Glue Dots (103683)


Measurements:


         Soft Suede: 5 1/2" x 8 1/2" scored at 4 1/4"

·         Basic White: 5 1/8” x 3 7/8”

·         Red Velvet: 3 1/4" x 4 1/2"

·         Ribbon: 13”


Instructions:


  1.  11,  Emboss Basic White panel with Timeworn Type Embossing Folder and adhere to card base with Stampin’ Seal adhesive

2.    2,  Use the same adhesive to adhere the Red Velvet layer in place

3.    3,  Wrap around a piece of Real Red Mini Ruffled Ribbon and tie in a knot

4.    4,  Use a die from Scalloped Contours Die to shape the Basic White mat

5.    5,  Use dies from Cloche Dies to cut the ‘snow’ pieces at the bottom of the panel from Basic White cardstock, the trees from Garden Green cardstock and the base tree from Soft Suede cardstock – use Stampin’ Seal, Mini Stampin’ Dimensionals and Stampin’ Dimensionals to adhere them in layers in place where desired

6.    6,  Stamp the sentiment using a stamp from Classic Cloche stamp set in Early Espresso Ink and adhere to the card using Stampin’ Dimensionals

7.    7,  Stamp the birds using Tuxedo Black Memento Ink onto white cardstock and color using Real Red and Daffodil Delight Stampin’ Blends

8.    8,  Use a die from Classic Cloche Dies to cut out and adhere to the card – use a Mini Glue Dot for the one behind the sentiment and two Stampin’ Dimensionals layered on top of one another for the bird in front

9.   9,   Dot around some white Elegant Faceted Gems to finish


 And as always if you have any questions..please fell free to contact me...I am always happy to help!!


until next time...take care and happy stamping!!
Love, Renee 💖 


Click Here to Join our Team today! 


Check out my Facebook Fridays for a weekly Stamp Therapy!!  Every Friday Morning at 11am CST at my page Water City Stamping Facebook Page

Thank you so much for your online orders!  I truly appreciate it! 

Click here to shop now!!  

And don't forget to join my Water City Stamping V.I.S. (Very Important Stamper!) Facebook Group for more creative ideas, specials and current updates!!  CLICK HERE TO JOIN!


Monday, November 8, 2021

Make it Monday - Classic Cloche

 One of the prettiest sets in the Holiday Catalog is the Classic Cloche!  And I always love a church scene in the winter....


so peaceful.....
Here is your tutorial to make your own!


    Supplies:

Stamp Sets: Classic Cloche (156395) or discounted as a bundle with the Cloche Dies(156786)

·      Card Stock and Paper: Night of Navy (100867); Cork 12” x 12” Specialty Paper (156393); Basic White (159276); Window Sheets (142314); In Good Taste Designer Series Paper (152494)

·      Stamp Pads: Tuxedo Black Memento Ink Pad (132708); Versamark Pad (102283)

·      Tools: Stampin’ Cut & Emboss Machine (149653); Heat Tool (129053); Bone Folder (102300); Paper Snips (103579)

·      Miscellaneous: Cloche Dies (156386) or discounted as a bundle with the Cloche Dies (156786); White Stampin’ Chalk Marker (132133); Crumb Cake Stampin’ Blends Combo Pack (154882); Gray Granite Stampin’ Blends Combo Pack (154886); Night of Navy Stampin’ Blends Combo Pack (154891); Daffodil Delight Stampin’ Blends Combo Pack (154883); Wink of Stella (141897); Elegant Faceted Gems (152464); Basics Embossing Powders (155554); White 3/8” Glittered Organdy Ribbon (156408); Stampin’ Seal (152813); Mini Glue Dots (103683), Dimensionals (104430), Fine-Tip Glue Pen (138309)


Measurements:

·      Night of Navy (base):  5-1/2” x 8-1/2”; scored at 4-1/4”

·      Night of Navy (for dome):  4” x 3

·      Designer Series Paper: 5-1/4” x 1-3/4”

·      Cork Paper:  3” x 1/2”

·      Window Sheet:  4” x 3

·      Basic White: 4” x 3” (2 pieces)

·      Ribbon: 9”


Instructions:

1.      Fold the Night of Navy card base in half.

2.      Attach the Designer Series Paper to the bottom of the card front, using Seal Adhesive.

3.      Stamp the saying from the stamp set, with Versamark ink, just above the Designer Series Paper on the right-hand side of the card. Sprinkle the saying with White embossing powder and heat set with the Heat Tool.

4.      Die cut out a cloche shape from one of the Basic White cardstock pieces. Die cut another cloche shape from the Window Sheet.

5.      Stamp the cloche image, using Tuxedo Black Memento Ink, on the smaller piece of Night of Navy cardstock. Cut it out very close the stamped line, using your Paper Snips Scissors.

6.      Stamp the buildings image, using Tuxedo Black Memento Ink, on to one of the pieces of Basic White cardstock.

7.      Color in the buildings image using the Blends markers.

8.      Die cut out the buildings image with the matching dies.

9.      Attach the building image to the Night of Navy cloche cut out and then to the Basic white cloche die cut using Seal Adhesive.

10.   Add some Wink of Stella to the snow parts of the image.

11.   Use the Chalk marker to add some “dots” of snow over the image.

12.   Use the Fine-Tip Glue Pen to add a small line of glue around the entire image. Use the Black line on the Night of Navy cloche die cut as your Guide.

13.   Carefully add the window sheet to the image.  Let it dry.

14.   Attach the dome to the front of the card using dimensionals.

15.   Attach the cork die cut to the front of the dome using Seal Adhesive.

16.   Tie the ribbon in a bow and attach it to the dome using glue dots.

17.  
Add 3 of the white Elegant Faceted Gems to the front of the card.


 And as always if you have any questions..please fell free to contact me...I am always happy to help!!


until next time...take care and happy stamping!!
Love, Renee 💖 


Click Here to Join our Team today! 


Check out my Facebook Fridays for a weekly Stamp Therapy!!  Every Friday Morning at 11am CST at my page Water City Stamping Facebook Page

Thank you so much for your online orders!  I truly appreciate it! 

Click here to shop now!!  

And don't forget to join my Water City Stamping V.I.S. (Very Important Stamper!) Facebook Group for more creative ideas, specials and current updates!!  CLICK HERE TO JOIN!