Saturday, October 30, 2021

More Paper Pumpkin Alternative Projects...Peaceful Christmas!

Hello Stampers!!

 Here is another round of alternative projects for this months Paper Pumpkin...it is soooo easy to create with this Peaceful Christmas!!  

To see the video for assembly and measurement details...CLICK HERE!   

I knew I wanted to make more shaker cards ...as in the previous post...

The Subtle Shimmer Sequins are perfect for this shaker card.   The trees from the card was colored with Old Olive Stampin Blends and finish with some Holiday Rhinestones  for a stunning touch!


Using stamps and sentiments from the Paper Pumpkin...for the inside of the card.


Finish with a Noel die cut...all from the kit!!


So sparkly!!

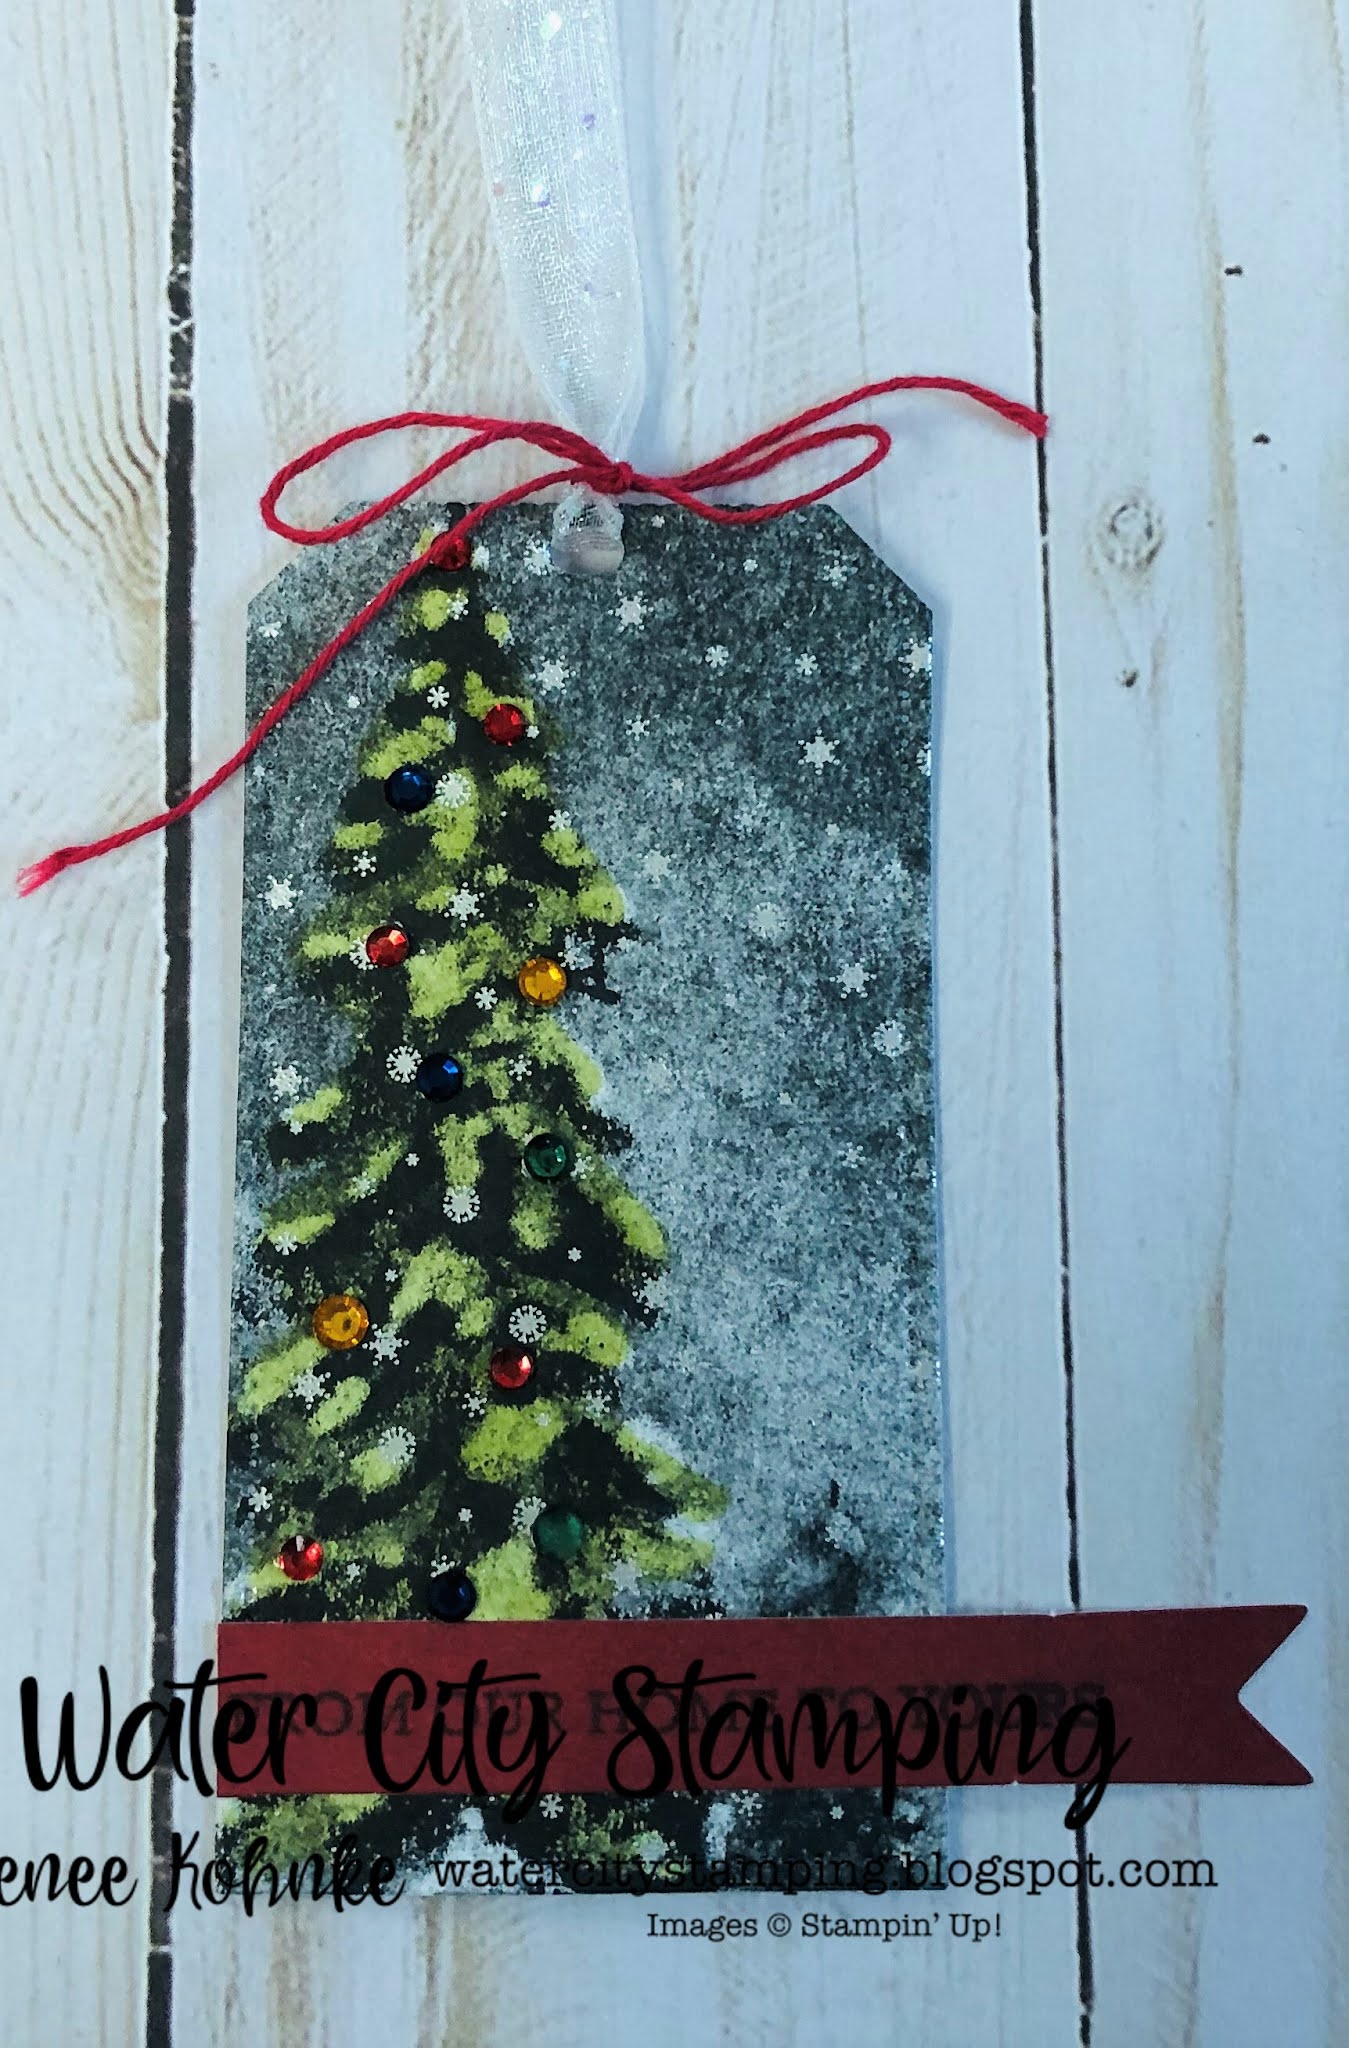
Continuing with the sparkle...how about some quick tags....take a card and the Tailor Made Tag Dies...cut some tags...


And embellish!!!  Finish with Shimmer White Ribbon tied with the included red twine.

Easy and pretty!


And finally...how about just a simple card...all in the same look...


Again...just color in the tree with Stampin Blends...add a snow hill and some gems and a Shimmer White bow...


Paper Pumpkin sentiments...


Just lovely!!

And here is a sneak peak for the November Paper Pumpkin ......I can't wait for this one!!!   How about you...just subscribe or order by November 10th!!


We all love to see piles of presents on Christmas morning. Make that your reality with the Gifts Galore Paper Pumpkin Kit! With classic Christmas sentiments, bright and festive colors, a sweet snowman, a tree with all the trimmings, or a playful pile of presents, you’ll have everything you need to make eye-catching treat packages that are sure to spread Christmas cheer. Each Gifts Galore box contains enough supplies to create nine treat packages—three each of three designs—and nine food-safe bags that are adorably styled for easy Christmas gifting. There’s plenty of joy to share with Gifts Galore!


CLICK HERE TO SUBSCRIBE!

Or if you would like a prepaid subscription ..order a 3, 6 or 12 month subscription and save some money on each kit!!

CLICK HERE TO SHOP PAPER PUMPKIN!!

And as always thank you for choosing me as your demonstrator!!!  Please use the Hostess Code HTGA4ZGS


 when ordering under $150 ...If you order over $150...take the Hostess Rewards for yourself!!

Thursday, October 28, 2021

A Paper Pumpkin Thing Blog Hop - Peaceful Christmas


Hello Stampers!
Thank you for joining our A Paper Pumpkin Thing Blog Hop.  This month's Pumpkin...Peaceful Christmas is stunning!


Immediately I thought of taking one of the envelopes.... yes the envelope .....and making a shaker card!!!
Check out my Facebook Live Here for measurements and assembly of this card. 
This is such a pretty card...with the silver trees from the envelope and the Shaded Spruce Gingham top layer....White Chalk Marker for added snow...and the Subtle Shimmer Sequins are a perfect shaker filler!!                                                       


Add the Silver Foil Noel die cut...and you have a pretty interactive card.
Continuing with another envelope ...they really are too pretty to use just for envelope ....so how  about some Christmas Tags??!!


Add a few Red Gems and a snow hill...white chalk marker for falling snow....tie a Glittered White Ribbon with some of the included Red twine


Pretty...easy and elegant!!

Now it is time to see what all the other fabulous demonstrators have created!!

Happy Hopping!!💓


If you would like to see more Peaceful Christmas Alternative Projects...check back here at Water City Stamping on Friday!!

And here is a sneak peak for the November Paper Pumpkin ......I can't wait for this one!!!   How about you...just subscribe or order by November 10th!!


We all love to see piles of presents on Christmas morning. Make that your reality with the Gifts Galore Paper Pumpkin Kit! With classic Christmas sentiments, bright and festive colors, a sweet snowman, a tree with all the trimmings, or a playful pile of presents, you’ll have everything you need to make eye-catching treat packages that are sure to spread Christmas cheer. Each Gifts Galore box contains enough supplies to create nine treat packages—three each of three designs—and nine food-safe bags that are adorably styled for easy Christmas gifting. There’s plenty of joy to share with Gifts Galore!


CLICK HERE TO SUBSCRIBE!

Or if you would like a prepaid subscription ..order a 3, 6 or 12 month subscription and save some money on each kit!!

CLICK HERE TO SHOP PAPER PUMPKIN!!

And as always thank you for choosing me as your demonstrator!!!  Please use the Hostess Code HTGA4ZGS


 when ordering under $150 ...If you order over $150...take the Hostess Rewards for yourself!!


Tuesday, October 26, 2021

Peaceful Deer

Hello Stampers!!

Here is a lovely seasonal card using the Peaceful Deer Stamp Set....It's not just for Christmas anymore...

Keep reading below to learn how to make this beauty!

Happy Stamping!!💓


 Supplies:

·         Bundle: Peaceful Deer Bundle (1569391)

·         Card Stock and Paper: Cherry Cobbler Cardstock (119685); Copper Foil Sheets (140202); Regals Designer Series Paper (155227), Basic White Cardstock (159276)

·         Stamp Pads: Cherry Cobber (147084); Pumpkin Pie (147086); Garden Green (147089), Sahara Sand (147117)

·         Tools: Stitched Rectangle Dies (151820); Stampin’ Cut & Emboss Machine (149653)

·         Miscellaneous: Gold 3/8” (1cm) Shimmer Ribbon (156470); Stampin’ Dimensionals (104430); Stampin’ Seal Adhesive (152813), Sponge Daubers (133773)


Measurements:

·         Cherry Cobbler Card Base: 8 ½” x 5 ½”, scored and folded at 4 ¼”

·         Cherry Cobbler Designer Series Paper: 5 ½” x 3 ½”

·         Copper Foil: 5 ½” x 1”

·         Cherry Cobbler:

·         Basic White Insert: 5 ½” x 4”

·         Scrap piece of Basic White Cardstock for stamping and die cutting

·         Gold Ribbon (2 pieces): 4”


Instructions:

1.    Adhere the Copper Foil to the back of the Cherry Cobbler Designer Series Paper, ensuring about ¼”  sticks out on the left side. Adhere with Stampin’ Seal.

2.    Adhere your Designer Series Paper and Copper Foil layer to your Cherry Cobbler card base using Stampin’ Seal.

3.    Adhere your Basic White insert layer to the inside of your card using Stampin’ Seal.

4.    On your Basic White stitched rectangle, ink your large tree stamp and two of the double tree stamps using your Sponge Daubers and all of the ink colours noted above. Starting with your Sahara Sand Ink on the trunks, add in the other colours randomly on the trees. You’ll want to start with your lightest colour first (not including Sahara Sand) as this will minimize the possibility of mixing ink pads. Then, once you are ready, stamp your largest tree first and then stamp again beside the first stamped image. Do this same technique for all three stamps as this will create the effect of trees near and far (darker and lighter).

5.    Stamp the sentiment using Cherry Cobbler Ink at the bottom of the rectangle.

6.    Wrap a 4” piece of ribbon around the stitched rectangle, between the trees and sentiment and adhere to the back using Stampin’ Seal. Then, adhere the stitched rectangle to your Cherry Cobbler Cardstock layer.

7.    Adhere the stamped layer to your card front using Stampin’ Dimensionals.

8.    Tie a knot with your remaining piece of Gold Ribbon and adhere if to your card using a Mini Glue Dot. Trim the ends as necessary.


 And as always if you have any questions..please fell free to contact me...I am always happy to help!!


until next time...take care and happy stamping!!

Love, Renee 💖 


Click Here to Join our Team today! 


Check out my Facebook Fridays for a weekly Stamp Therapy!!  Every Friday Morning at 11am CST at my page Water City Stamping Facebook Page

Thank you so much for your online orders!  I truly appreciate it! 

Click here to shop now!!  

And don't forget to join my Water City Stamping V.I.S. (Very Important Stamper!) Facebook Group for more creative ideas, specials and current updates!!  CLICK HERE TO JOIN!


Sunday, October 24, 2021

 Hello Stampers!!

How about some more cheer today???  More Delivering Cheer that is!!!  Here is another sweet alternative project using that sweet gal...just in time for a darling Halloween card!!  Supplies and Measurements below!


Supplies:


  • ·         Stamp Sets: Delivering Cheer (156268), Pretty Pumpkins (156478), Banner Year (158239), Frightfully Cute Bundle (156493)
  • ·         Card Stock and Paper: Basic Black (121045), Pumpkin Pie (105117), Basic White (159276)
  • ·         Stamp Pads: Versa Mark (102283), Memento Black (132708), Blends: Highland Heather (154887), Pumpkin Pie (154897), Petal Pink (154893), Old Olive (154892), Cajun Craze (154879), Soft Suede (154906), Basic Black Stampin’ Write Marker (100082)
  • ·         Tools: Scalloped Contours Dies (155560), Heat Tool (129053
  • ·         Miscellaneous: Basics Embossing Powders (155554), Stampin’ Dimensionals (104430); Stampin’ Seal Adhesive (152813)


Measurements:


  • ·         Basic Black: 8 ½” x 5 ½”, 2 ¼” x 1 ¾”, plus scrap
  • ·         Pumpkin Pie: 5 ½” x 4 ¼”
  • ·         Basic White: 4 5/8” x 3 ¼”, 3” x 2 ½


Instructions:

1.    1.Score and fold card base at 4 ¼” on long side.

2.   2. Die cut Pumpkin Pie cardstock using Scalloped Contours Die (largest one), then adhere to card front using Stampin’ Dimensionals.

3.  3.  Stamp leg image using Delivering Cheer stamp set on to largest Basic White cardstock piece.

4.   4. Color legs using Light Petal Pink Blends and create witch boots using Stampin’ Write Black Marker.

5.   5. Stamp dress image on Basic Black cardstock using Versamark Pad.

6.   6. Sprinkle white Embossing Powder on image and use Heat Tool to emboss.

7.   7. Fussy cut skirt and adhere to card front.

8.   8. Stamp arms and pumpkin image on scrap white cardstock.

9.   9. Color pumpkins using Pumpkin Pie, Cajun Craze, Old Olive, and Soft Suede Blends.

10. 10.Stamp jack o’ lantern face on pumpkins using Memento Black ink

11. 11. Fussy cut pumpkins apart and adhere above dress, arranging them so you don’t see where parts are cut away from the pumpkin) using Stampin’ Dimensionals.

12. 12.Color arms using Highland Heather and Petal Pink Blends, and also Basic Black Stampin’ Write Marker.

13. 13.Fussy cut arms and adhere to card front as shown in photo using Stampin’ Dimensionals.

14.14. Die cut Basic Black witch hat from Frightful Tag Dies and place on top of pumpkins using Stampin’ Dimensionals.

15. 15.Color JUST THE SPIDER on stamp using Basic Black Stampin’ Write Marker and stamp beside witch’s hat.

16. 16.Draw a squiggly line using Basic Black Stampin’ Write Marker from top of hat to spider.  


 And as always if you have any questions..please fell free to contact me...I am always happy to help!!


until next time...take care and happy stamping!!

Love, Renee 💖 


Click Here to Join our Team today! 


Check out my Facebook Fridays for a weekly Stamp Therapy!!  Every Friday Morning at 11am CST at my page Water City Stamping Facebook Page

Thank you so much for your online orders!  I truly appreciate it! 

Click here to shop now!!  

And don't forget to join my Water City Stamping V.I.S. (Very Important Stamper!) Facebook Group for more creative ideas, specials and current updates!!  CLICK HERE TO JOIN!


Friday, October 22, 2021

Welcoming Woods

Hello Stampers!!
And Happy Friday!!   I have another fun tutorial for you today...using the soft quiet beauty of the Welcoming Woods...grab your Blending Brushes and enjoy!!  Happy Stamping!💓


Supplies:


Stamp Sets: Welcoming Woods (156550)

Card Stock and Paper: Crumb Cake Cardstock (120953); Basic White Cardstock (159276); Early Espresso Cardstock (119686) 

Stamp Pads: Crumb Cake Classic Stampin’ Pad (147116); Balmy Blue Classic Stampin’ Pad (147105); Misty Moonlight Classic Stampin’ Pad (153081); Daffodil Delight Classic Stampin’ Pad (147094); Soft Suede Classic Stampin’ Pad (147115); Early Espresso Classic Stampin’ Pad (147114)

Tools: Timber 3D Embossing Folder (156406); Blending Brushes (153611)

Miscellaneous: Soft Suede Stampin’ Blends Combo Pack (154906); Crumb Cake Stampin’ Blends Combo Pack (154882); Wonderful Gems (153536); Simply Elegant Trim (155766); Stampin’ Dimensionals (104430); Stampin’ Seal Adhesive (152813) Sticky Note or scrap paper for masking


Measurements:


Crumb Cake Card Stock: 11” x 4 ¼”, 5 ½” x 2 ½” 

Basic White Cardstock: 4” x 4” 

Early Espresso Cardstock: 

DSP: 4 1/8” x 4 1/8”

Gold Simply Elegant Trim: 21”


Instructions:


1. Fold Crumb Cake card base in half to form 5 ½” x 4 ¼” card.

2. Run the 5 ½” x 2 ½” piece of Crumb Cake CS through the Timber 3D Embossing Folder and adhere to center or card front running Top to Bottom.

3. Stamp birch tree stamp on to Basic White CS with Crumb Cake Classic Stampin’ Pad making sure trees reach or run off the top of paper. You may need to stamp the image twice next to each other depending on your placement.

4. Stamp “Ground” image in Soft Suede Classic Ink and stamp “around” tree base to simulate the ground or horizon.  

5. Using a sticky note or scrap paper mask off the top half of your card.  Swipe your Crumb Cake Classic Stampin’ Pad with your Blending Brush and starting off your image work color onto the base of your trees from each side leaving the center light or almost white.  Do the Same thing with the Soft Suede Classic Stampin’ Pad but only on edges of your card bringing the dark in from each side.

6. Unmask your card and reverse it masking the part you just colored leaving the top half open for blending.  

7. Blending color in a “U” shape; add Balmy Blue color with Classic Stampin’ Pad and a Blending Brush. Continue same process with Misty Moonlight Classic Stampin’ Pad only bringing it in slight on right and left side of card and bottom of masked area.  Finish by blending Daffodil Delight Classic Stampin’ Pad in the center of the “U” simulating light coming in from above.

8. Stamp leaves twice with Crumb Cake Classic Stampin’ Pad

9. Using your Crumb Cake Blends Combo Pack and color around the base of trees to make them feel “grounded”. 

10. Using a Dark Soft Suede Blends Brush Tip and “flick” ink onto card front by brushing it on inside of cap causing splattering onto the card.

11. Stamp “Hello Friend” greeting onto bottom of stamped and colored card with Early Espresso Classic Stampin’ Pad.

12. Wrap Gold Trim around card twice and tie in a bow offsetting it from the greeting.

13. Adhere Basic White CS piece to Early Espresso CS and use Stampin’ Dimensionals to adhere to card base.

14. Add 3 of the gold specked gems from the Wonderful Gems pack onto card front.  


And as always if you have any questions..please fell free to contact me...I am always happy to help!!

until next time...take care and happy stamping!!

Love, Renee 💖 


Click Here to Join our Team today! 


Check out my Facebook Fridays for a weekly Stamp Therapy!!  Every Friday Morning at 11am CST at my page Water City Stamping Facebook Page

Thank you so much for your online orders!  I truly appreciate it! 

Click here to shop now!!  

And don't forget to join my Water City Stamping V.I.S. (Very Important Stamper!) Facebook Group for more creative ideas, specials and current updates!!  CLICK HERE TO JOIN!


Wednesday, October 20, 2021

Delivering Cheer Autumn Card Tutorial!

Woohoo!!   It is Wednesday. and what wonderful Autumn weather we have been enjoying!   Prefect for the Delivering Cheer gal carrying a load of pumpkins...how cute!!  Make one for yourself!  
Supplies and directions are below!!


Supplies:

Stamp Sets: Delivering Cheer (156268), Pretty Pumpkins (156478), 
Card Stock and Paper: Crumb Cake (120953), Pumpkin Pie (105117), Cajun Craze (119684), Basic White (159276), Pattern Party Designer Series Paper (155426), Pansy Petals Designer Series Paper (155807)
Stamp Pads: Memento Black (132708), Blends: Pumpkin Pie (154897), Petal Pink (154893), Old Olive (154892), Cajun Craze (154879), Soft Suede (154906), Crumb Cake (154882), Bumblebee Stampin’ Write Marker (153125)
Tools: Stitched Rectangles Dies
(151820)
Miscellaneous: Linen Thread (104199), Stampin’ Dimensionals (104430); Stampin’ Seal Adhesive (152813), Multipurpose Liquid Glue (110755)
Measurements:

Crumb Cake: 11” x 4 ¼”
Pumpkin Pie: 2 ¾” x 4 ¼”
Cajun Craze: 2 7/8” x 3/8”
Basic White: 2 ¾” x 4 ¼” plus scraps
Pattern Party DSP: 5 ½” x 5/8” strips (cut 2)
Pansy Petals DSP: scraps

Instructions:

1. Score and fold card base at 5 ½” on long side.
2. Trim the front cardstock piece only 5/8” on each side, just to score line as pictured to the right. 
3. Trim away the front rectangle pieces as shown in yellow here.
4. Adhere 2 DSP strips to back panel of card.
5. Stamp sentiment on bottom front flap of card using Memento Black ink
6. Adhere Cajun Craze cardstock to front card flap using Dimensionals.
7. Adhere Pumpkin Pie cardstock to front card flap. 
8. Die cut Basic White cardstock using Stitched Rectangles Dies (2 5/8” x 4”).
9. Stamp leg image using Delivering Cheer stamp set on to white cardstock piece.
10. Color legs using Light Petal Pink Blends. 
11. Stamp dress image on scrap piece of Pansy Petals DSP, fussy cut and adhere to card front.
12. Stamp arms and pumpkin image on scrap white cardstock.
13. Color pumpkins using Pumpkin Pie, Cajun Craze, Old Olive, and Soft Suede Blends. 
14. Color arms using Petal Pink and Crumb Cake Blends, and Bumblebee Stampin’ Write Marker.
15. Fussy cut pumpkins apart, arranging them so you don’t see where parts are cut away from the pumpkin, and adhere to card front using Dimensionals.
16. Fussy cut arms and adhere to card front (above dress) using Stampin’ Dimensionals.
17. Adhere this to card front.
18. Add a bow from Linen Thread and adhere to Pumpkin. 


And as always if you have any questions..please fell free to contact me...I am always happy to help!!

until next time...take care and happy stamping!!

Love, Renee 💖 


Click Here to Join our Team today! 


Check out my Facebook Fridays for a weekly Stamp Therapy!!  Every Friday Morning at 11am CST at my page Water City Stamping Facebook Page

Thank you so much for your online orders!  I truly appreciate it! 

Click here to shop now!!  

And don't forget to join my Water City Stamping V.I.S. (Very Important Stamper!) Facebook Group for more creative ideas, specials and current updates!!  CLICK HERE TO JOIN!